Popular Questions
Do I need to enable data roaming to use the eSIM plan?
Yes, please ensure that [Data Roaming] is turned on to use data with your eSIM.
Follow the instructions below to enable data roaming.
Apple
01. Go to [Settings] > [Cellular/Mobile Service]
02. Select our eSIM under the SIMs section
03. Scroll down to toggle on “Data Roaming”
Samsung
01. Go to [Settings] > [Connections] > [Mobile networks]
02. Toggle on “Data roaming”
01. Go to [Settings] > [Network & Internet] > [SIMs]
02. Select our eSIM
03. Toggle on “Roaming”
How do I check if my phone is unlocked?
Unfortunately, you cannot use an eSIM with a locked phone.
To determine if your device is locked, you can follow the instructions in your device settings. If your phone is locked, please contact your carrier to unlock it before attempting to use the eSIM plan.
Apple
01. Go to [Settings] > [General] > [About] and scroll down
02. If you see “Carrier Lock – No SIM restrictions” and “eSIM – IMEI (number will appear),” your phone is compatible with eSIM
03. If you can’t find these, your phone doesn’t support eSIM
Samsung
01. Go to [Settings] > [Connections] > [Mobile networks]
02. Choose [Select roaming network/Network operators]
03. Toggle off ‘Select automatically’◦ If multiple networks appear, the phone is likely unlocked.◦ If only one network appears, or if the Search Networks option is unavailable, the phone is most likely locked to the carrier.
01. Go to [Settings] > [Network & Internet] > [SIMs]
02. Select your current SIM
03. Toggle off [Automatically select network]◦ If multiple networks appear, the phone is likely unlocked.◦ If only one network appears, or if the Search Networks option is unavailable, the phone is most likely locked to the carrier.
What should I do if I can’t use the internet?
If you’ve installed the eSIM correctly but can’t access the internet, please try the troubleshooting steps below.
DO NOT remove the eSIM, as it cannot be reinstalled or regenerated.
Apple
A. Enable “Data Roaming” for the eSIM
B. Ensure the eSIM is Selected for Cellular/Mobile Data
01. Go to [Settings] > [Cellular/Mobile Service]
02. Select our eSIM for [Cellular data/Mobile data]
C. Manually Set Up the APN
01. Go to [Settings] > [Cellular/Mobile Service]
02. Select our eSIM under the SIMs section
03. Click [Cellular Data Network]
04. Type the APN information in the APN field
D. Perform Manual Network Selection
01. Go to [Settings] > [Cellular/Mobile Service]
02. Select our eSIM under the SIMs section
03. Choose [Network selection]
04. Toggle off ‘Automatic’
05. Select the name of the telecom provider for your current country from the list of available networks.
Samsung
A. Enable “Data Roaming” for the eSIM
B. Ensure the eSIM is Selected for Cellular/Mobile Data
01. Go to [Settings] > [Connections] > [SIM manager]
02. Select our eSIM for [Mobile data]
C. Manually Set Up the APN
01. Go to [Settings] > [Connections] > [Mobile networks]
02. Click [Access Point Names]
03. Make sure you choose our eSIM and click “+” to add APN
04. Type the APN information in the APN field
D. Perform Manual Network Selection
01. Go to [Settings] > [Connections] > [Mobile networks]
02. Choose [Select roaming network/Network operators]
03. Toggle off ‘Select automatically’
04. Select the name of the telecom provider for your current country from the list of available networks
A. Enable “Data Roaming” for the eSIM
B. Ensure the eSIM is Selected for Cellular/Mobile Data
01. Go to [Settings] > [Network & Internet] > [SIMs]
02. Select our eSIM and turn on [Mobile data]
03. Choose “Use eSIM”
C. Manually Set Up the APN
01. Go to [Settings] > [Network & Internet] > [SIMs]
02. Select our eSIM
03. Scroll down to choose [Access Point Names]
04. Click “+” to add APN
05. Type the APN information in the APN field
D. Perform Manual Network Selection
01. Go to [Settings] > [Network & Internet] > [SIMs]
02. Select our eSIM
03. Toggle off [Automatically select network]
04. Select the name of the telecom provider for your current country from the list of available networks
Please contact us via [email protected] for further assistance.
Can I delete and reinstall my eSIM plan?
In most cases, once an eSIM plan is installed, it cannot be reinstalled or reissued.
If you encounter any issues, please do not delete your eSIM plan. Instead, contact us at [email protected] for assistance.
Does the plan provide a local phone number?
Unfortunately, the eSIM plan you purchased is data-only and does not include a local phone number. The number displayed in the eSIM settings is for management purposes only.
We recommend using services like Skype, WhatsApp, or other social media platforms to make calls using your data with the eSIM.
When does the eSIM plan start?
There are two possible scenarios depending on your eSIM plan:
01. Activation upon connection to the local network (e.g., upon arrival at your destination):
◦ You can purchase and activate your eSIM before your trip.
02. Activation upon installation on your phone:
◦ We suggest installing the eSIM one day before your trip or once you arrive at your destination.
We recommend reading the “Things to Know” section on the product page for details. If you are unsure, please contact us at [email protected].
How do I contact ESIMJAPAN.com Team?
Our 24/7 specialists are ready to help you with any issue. If you have any questions or concerns, please don’t hesitate to contact us at [email protected] or via WhatsApp.
Before Order
Which phones support the eSIM service?
Compatible Devices for eSIM Japan Data Plans
Apple
✓ Compatible device
iPhone Air
iPhone 17, 17 Pro, 17 Pro Max
iPhone 16, 16 Plus, 16 Pro, 16 Pro Max
iPhone 15, 15 Plus, 15 Pro, 15 Pro Max
iPhone 14, 14 Plus, 14 Pro, 14 Pro Max
iPhone SE3 (2022)
iPhone 13, 13 Pro, 13 Pro Max, 13 Mini
iPhone 12, 12 Pro, 12 Pro Max, 12 Mini
iPhone 11, 11 Pro, 11 Pro Max
iPhone SE2 (2020)
iPhone XR, iPhone XS, XS Max
(Recommended iOS version: iOS 13.3 or later)
! Incompatible Device
iPhone purchased from mainland China
iPhone purchased from Hong Kong and Macao (except for iPhone 13 mini, iPhone 12 mini, iPhone SE 2020, and iPhone XS)
Samsung
✓ Compatible device
Galaxy S26 5G, S26 Ultra 5G, S26+ 5G
Galaxy S25 5G, S25 Ultra 5G, S25+ 5G
Galaxy S24 5G, S24 Ultra 5G, S24+ 5G, S24 FE
Galaxy S23 5G, S23 Ultra 5G, S23+ 5G
Galaxy S22 5G, S22 Ultra 5G, S22+ 5G
Galaxy S21 5G, S21 Ultra 5G, S21+ 5G
Galaxy S20, S20+, S20 Ultra 5G
Galaxy Note 20, Note 20 Ultra, Note 20 Ultra 5G
Galaxy Note 20+, Note 20 FE, Note 20 FE 5G
Galaxy Fold, Z Fold 2, Z Fold 3, Z Fold 4 5G, Z Fold 5, Z Fold 6, Z Fold 7
Galaxy Z Flip, Z Flip 3 5G, Z Flip 4 5G, Z Flip 5, Z Flip 6, Z Flip 7
Galaxy A23 5G, A35 5G, A54 5G, A55 5G
! Incompatible Device
All Samsung S20 FE/S21 FE models
S20/S21 and Galaxy Z Flip 5G from USA
Note 20 Ultra and Galaxy Z Fold 2 from USA and Hong Kong
✓ Compatible device
Pixel 10, Pixel 10 Pro, Pixel 10 Pro XL, Pixel 10 Pro Fold, Pixel 10a
Pixel 9, 9Pro, 9Pro XL
Pixel 8, 8Pro
Pixel 7, 7Pro
Pixel 6, 6a, 6Pro
Pixel 5, 5a
Pixel 4, 4a, 4XL
Pixel 3, 3XL
Pixel 3a, 3aXL
! Incompatible Device
Pixel 3 models manufactured from Australia, Taiwan, and Japan
Pixel 3 models bought from US or Canadian carriers other than Sprint and Google Fi
Pixel 3a models bought in South East Asia and with Verizon service
✱ If your device is not listed above, please contact ESIMJAPAN.com Team.
Which devices are not compatible with eSIM?
If you have the following devices, you cannot use eSIM:
iPhone Models That Don’t Support eSIM
◦ Carrier-locked iPhones
◦ iPhones purchased from Mainland China, Hong Kong, or Macao (Note: Hong Kong and Macao versions that support eSIM include iPhone XS, iPhone SE (2nd and 3rd generation only), iPhone 12 mini, and iPhone 13 mini)
◦ iPhone 6
◦ iPhone 7 series
◦ iPhone 8 series
◦ iPhone X
◦ iPhone SE (1st Generation)
Samsung models don’t support eSIM
◦ Carrier-locked Samsung devices
◦ All Samsung S20 FE and S21 FE models (Note: Other S20 and S21 models may support eSIM)
◦ USA versions of Samsung S20/S21 and Galaxy Z Flip 5G
◦ USA and Hong Kong versions of Samsung Note 20 Ultra and Galaxy Z Fold 2
◦ South Korean versions of most Samsung devices (Note: Samsung Galaxy Z Flip 4 and Galaxy Z Fold 4 purchased in South Korea support eSIM)
◦ Canada and USA versions of Samsung S21 series devices (except FE models) may support eSIM if the One UI 4 update is installed
◦ Samsung Galaxy Note 9, Note 10, Note 10+ or Note Lite
◦ Samsung Galaxy S10, S10e, S10 Lite or S10+
◦ Samsung S9 or S9+
◦ Samsung S8 or S8+
◦ Samsung S7
◦ Samsung A series (A20, A21, A22, A23, A30, A52)
Other devices don’t support eSIM
◦ Any carrier-locked device
◦ Huawei P30 series
◦ Huawei Mate series (e.g., Mate 10, Mate 20 Pro)
◦ Xiaomi Redmi Note series (e.g., 9 Pro, 9T)
◦ Xiaomi devices (e.g., Poco F3, 12T)
◦ Oppo devices
◦ Surface Duo devices
◦ One Plus Nord
◦ Sony Xperia
◦ Asus ROG
How do I check if my device supports eSIM?
To determine if your device supports eSIM, you can check for the Secondary “IMEI” number or verify the option to add eSIM by following these steps:
Apple
01. Go to [Settings]
02. Tap [General] > [About]
03. Scroll down to view the device’s Serial Number and IMEI for your primary and secondary SIM cards.
04. If you see two IMEI numbers, your device supports eSIM
Samsung
01. Go to [Settings] > [SIM Manager]
02. If [Add eSIM] is available, your device likely supports eSIM
01. Go to [Settings] > [Network & Internet] > [SIMs]
02. If [Add eSIM] is available, your device likely supports eSIM
Other Android
01. Dial *#06# and press call
02. If you see IMEI2 and EID, your device likely supports eSIM
When should I buy the eSIM?
You can purchase the eSIM at any time, as it remains valid for 180 days from the date of purchase.
However, be mindful of the activation details, as the plan’s validity may start upon activation. For specific information about when your plan begins, please refer to the “Things to Know” section.
If your plan begins upon connecting to a local network, we recommend purchasing and activating the eSIM before your trip to ensure a smooth setup.
Can I buy multiple eSIMs at once?
Yes! You can purchase multiple eSIMs for yourself or for others.
When doing so, please keep the following in mind:
1. Each eSIM is unique: Every eSIM comes with its own ICCID (shown on the QR code voucher along with your order number). Use this to tell them apart.
2. One device only: Each eSIM can only be installed once, on a single device. It cannot be moved or reinstalled on another device.
3. Don’t share ICCIDs: The same ICCID cannot be used on two devices. Make sure each eSIM is installed on its intended device.
4. Don’t delete your eSIM: If you remove an eSIM after installation, it cannot be reinstalled.
Can I use a hotspot or tethering with my eSIM?
Yes, you can use hotspots and tethering to share data with eSIM. However, be aware that data speeds may be slower when sharing with a laptop compared to mobile devices, as the eSIM is optimized for mobile use. For the best performance, use the eSIM to share data with other mobile devices.
What currency is the price based on?
All transactions are processed in USD (United States Dollars).
Can I use City eSIM Plans outside of a particular city?
Yes, City eSIM Plans work throughout the entire Japan, not just in the specified city.
These plans are designed to connect you to the best network within the chosen city, making them ideal if you plan to spend an extended period there. However, you can still use the plan anywhere in the country.
Can I use your eSIM with my Apple Watch / iPad?
You can activate the eSIM on your iPad but not your Apple Watch. To activate the eSIM on your iPad, you must purchase one of the following options: eSIM Japan Daily Data plans or eSIM Japan 5G Unlimited Max Data. Ensure that your device is carrier-unlocked and compatible with eSIM, with Wi-Fi + Cellular capabilities.
Below is a list of smart devices that are compatible with eSIM:
eSIM Compatible iPad
◦ iPad Pro 11-inch (1st Gen, 2nd Gen, 3rd Gen)
◦ iPad Pro 12.9-inch (3rd Gen, 4th Gen, 5th Gen)
◦ iPad Air (3rd Gen, 4th Gen, 5th Gen)
◦ iPad (7th Gen, 8th Gen, 9th Gen)
◦ iPad mini (5th Gen, 6th Gen)
After Order
What should I do, when I didn’t receive a QR code email?
Our QR code is usually sent to the email address you provided within 15 minutes of placing your order. If you haven’t received it, please check the following:
01. Spam/Junk Folder: Sometimes the email might be redirected there.
02. Email Address Accuracy: Ensure there were no typos in the email address you provided. If you suspect an error, contact us at [email protected] so we can resend the QR code.
03. Email Linked to Payment: The QR code is sent to the email associated with your payment method. Please check that inbox as well.
If you continue to experience issues, please reach out to us at [email protected].
How do I activate my eSIM plan on my phone?
We will send you a confirmation email with a QR code after your purchase is completed.
There are 2 ways to add an eSIM to your device (please note that these steps may differ depending on your device & language.)
To activate the plan, you need to be connected in the strong WiFi signal and not in airplane mode.
Apple
A. Quick installation for iOS 17.4 or newer
01. Open the QR voucher we sent via email
02. Click the link located below the sentence “iOS 17.4 or newer?”
B. Activate by Scanning the QR Code
01. Go to [Settings] > [Cellular/Mobile Service] > [Add eSIM]
02. Scan the QR code you received via email
03. Your eSIM plan will be activated automatically once the details are set
C. Activate by Entering Manual Information
01. Go to [Settings] > [Cellular/Mobile Service] > [Add eSIM]
02. Tap [Use QR code]
03. Click [Enter Details Manually]
04. Enter the ‘SM-DP+ Address’ and ‘Activation Code’ provided in the email.
(Please make sure you don’t paste with https:// or http://)
05. Your eSIM plan will be activated automatically once the details are set
Samsung
A. Activate by Scanning the QR Code
01. Go to [Settings] > [SIM Manager] > [Add eSIM]
02. Tap [Scan QR code]
03. Scan the QR code you received via email
04. Your eSIM plan will be activated automatically once the details are set
B.Activate by Entering Manual Information
01. Go to [Settings] > [SIM Card Manager] > [Add eSIM]
02. Tap [Scan QR code] > [Enter activation code]
03. Click [Enter Details Manually]
04. Enter the ‘Activation Code’ provided in the email.
(Please make sure you don’t paste with https:// or http://)
05. Click “Add”
06. Your device will automatically start the activation process. Follow the on-screen instructions to complete the installation
A. Activate by Scanning the QR Code
01. Go to [Settings] > [Network & Internet] > [SIMs]
02. Select [+Add SIM] > [Download a new eSIM]
03. Scan the QR code you received via email
04. Confirm your eSIM by tapping [Download] in the lower-right corner of your screen
B.Activate by Entering Manual Information
01. Go to [Settings] > [Network & Internet] > [SIMs]
02. Select [+Add SIM] > [Download a new eSIM]
03. Tap [Need help?] > [Enter it manually]
04. Enter the ‘Activation Code’ provided in the email.
(Please make sure you don’t paste with https:// or http://)
05. Your device will automatically start the activation process. Follow the on-screen instructions to complete the installation.
How can I avoid accidental international roaming charges?
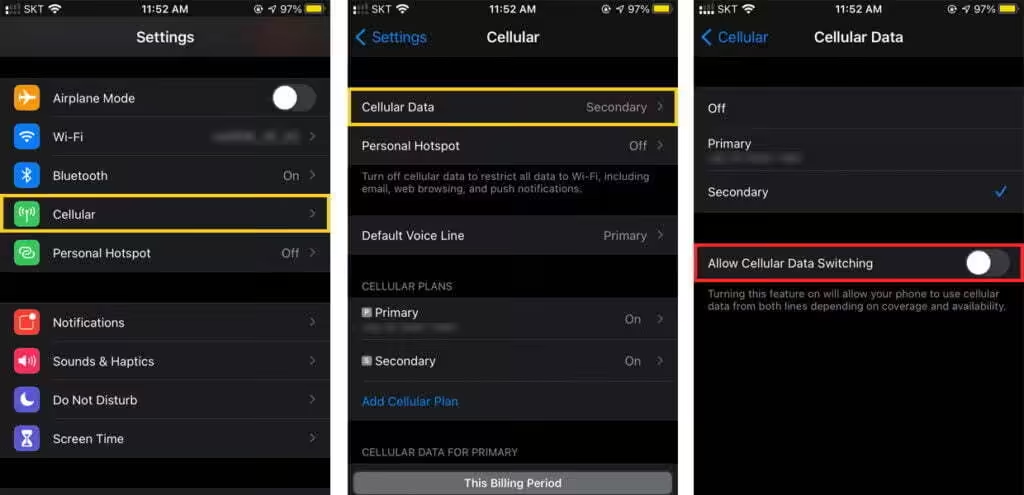
To avoid accidental international roaming charges through your primary line, follow these steps to disable automatic data switching:
Apple
01. Go to [Settings] > [Cellular/Mobile Service]
02. Tap [Cellular Data/Mobile Data]
03. Toggle off [Allow Cellular Data Switching]
Samsung
01. Go to [Settings] > [Connections] > [SIM manager]
02. Toggle off [Data switching]
You can also contact your domestic carrier and ask about subscribing to a ”Blocked charged international roaming” service to prevent any accidental charges.
Can I get a refund after using eSIM?
Unfortunately, we cannot process a refund once the eSIM has been installed and data has been used, as it is a digital product that cannot be restored or resold. If you encounter any issues with your eSIM, please contact us at [email protected], and we will assist you further.
How do I know whether I am using a new eSIM or my original SIM?
To determine whether you’re using your new eSIM or your original SIM, check which is selected for Mobile data.
Please follow the instructions below.
Apple
01. Go to [Settings] > [Cellular/Mobile Service]
02. Select our eSIM for [Cellular data/Mobile data]
Samsung
01. Go to [Settings] > [Connections] > [SIM manager]
02. Select our eSIM for [Mobile data]
01. Go to [Settings] > [Network & Internet] > [SIMs]
02. Select our eSIM and turn on [Mobile data]
03. Choose “Use eSIM”
To ensure you’re using the new eSIM, turn off your primary SIM and enable only the eSIM.
How can I check the balance or remaining data?
To determine exact data usage, please contact us at [email protected] for specific details related to your plan.
You can also check your approximate data usage directly on your device. Here’s how:
Apple
01. Go to [Settings] > [Cellular/Mobile Service]
02. Check the data used under “Current Period Roaming”
03. Alternatively, visit the Apple support page here or dial 1019# to view your data usage
Samsung
01. Go to [Settings] > [Connections]
02. Tap [Data usage]
03. View your total data usage displayed on the screen
01. Go to [Settings] > [Network & Internet] > [Internet]
02. Tap [Settings] next to your operator
03. The total data usage will be shown at the top of the screen
Can I scan the same QR code with multiple phones?
Unfortunately, no. Each eSIM can only be downloaded and activated on a single device. To use the eSIM on multiple devices, you will need to purchase separate eSIMs for each one.
How can I disable the eSIM plan while it is in use?
You can temporarily disable your eSIM plan instead of removing it. This allows you to re-enable and use it later. Please note, however, that once activated, the eSIM’s validity period continues to run, even if the plan is disabled.
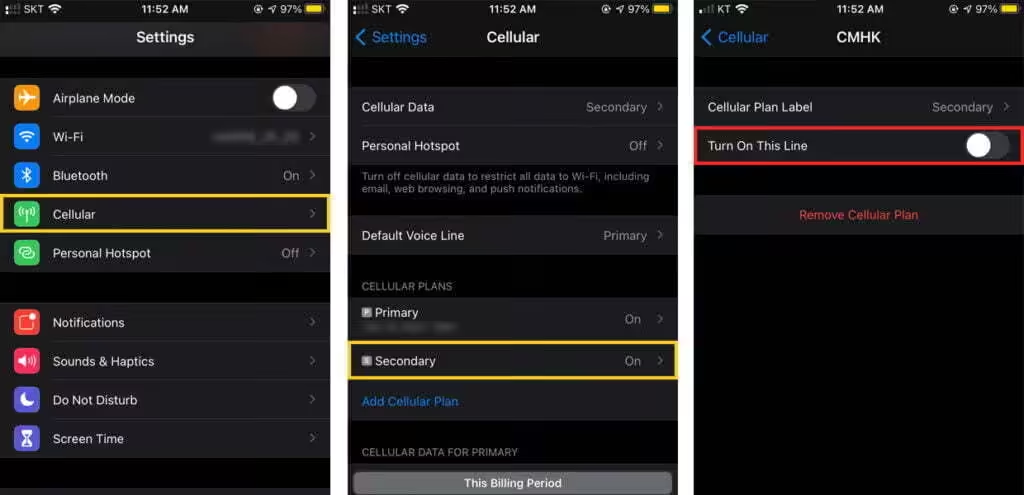
Follow the instructions below to disable your eSIM.
Apple
01. Go to [Settings] > [Cellular/Mobile Service]
02. Select our eSIM under the SIMs section
03. Toggle off [Turn On This Line]
Samsung
01. Go to [Settings] > [Connections] > [SIM manager]
02. Toggle off your eSIM under the eSIMs section
01. Go to [Settings] > [Network & Internet] > [SIMs]
02. Select our eSIM
03. Toggle off [Use eSIM]
How do I set APN?
Setting up your Access Point Name (APN) is essential for your device to connect to the internet and use data services effectively.
To find the APN information, click on ‘Instructions to Use Data’ at the bottom of the QR voucher email.
Here’s a guide on how to configure APN settings:
Apple
01. Go to [Settings] > [Cellular/Mobile Service]
02. Select our eSIM under the SIMs section
03. Click [Cellular Data Network]
04. Type the APN information in the APN field
05. Restart the device
Samsung
01. Go to [Settings] > [Connections] > [SIM manager]
02. Click [Access Point Names]
03. Make sure you choose our eSIM and click “+” to add APN
04. Type the APN information and save
05. Select the APN you just created
06. Restart the device
01. Go to [Settings] > [Network & Internet] > [SIMs]
02. Select our eSIM
03. Scroll down to choose [Access Point Names]
04. Click “+” to add APN
05. Type the APN information in the APN field.
06. Select the APN you just created
07. Restart the device
Please contact us via [email protected] for further assistance.
How do I delete the eSIM?
We recommend not removing the eSIM plan while it’s in use or immediately after use.
If you still need to remove the eSIM, follow these steps:
Apple
01. Go to [Settings] > [Cellular/Mobile Service]
02. Select our eSIM under the SIMs section
03. Scroll down to tap [Delete eSIM]
Samsung
01. Go to [Settings] > [Connections] > [SIM manager]
02. Select our eSIM
03. Tap [Remove]
01. Go to [Settings] > [Network & Internet] > [SIMs]
02. Select the eSIM you want to delete
03. Tap [Erase eSIM]
Troubleshooting
What can I do if my data speed is too slow?
Network speed depends on coverage, congestion, and the local carrier’s prioritization. If you experience slow speeds, try the following troubleshooting steps:
Apple
A. Perform Manual Network Selection
01. Go to [Settings] > [Cellular/Mobile Service]
02. Select our eSIM under the SIMs section
03. Choose [Network selection]
04. Toggle off ‘Automatic’
05. Select the name of the telecom provider for your current country from the list of available networks.
B. Reset the network connection
01. Turn on Airplane mode for 15 seconds
02. Turn off Airplane mode
C. Set the device to 3G temporarily
01. Go to [Settings] > [Connections] > [Mobile networks]
02. Tap [Network mode] and select 3G temporarily
Samsung
A. Perform Manual Network Selection
01. Go to [Settings] > [Connections] > [Mobile networks]
02. Choose [Select roaming network/Network operators]
03. Toggle off ‘Select automatically’
04. Select the name of the telecom provider for your current country from the list of available networks
B. Reset the network connection
01. Turn on Airplane mode for 15 seconds
02. Turn off Airplane mode
C. Set the device to 3G temporarily
01. Go to [Settings] > [Connections] > [Mobile networks]
02. Tap [Network mode]
03. Select 3G temporarily
A. Perform Manual Network Selection
01. Go to [Settings] > [Network & Internet] > [SIMs]
02. Select our eSIM
03. Toggle off [Automatically select network]
04. Select the name of the telecom provider for your current country from the list of available networks
B. Reset the network connection
01. Turn on Airplane mode for 15 seconds
02. Turn off Airplane mode
C. Set the device to 3G temporarily
01. Go to [Settings] > [Network & Internet] > [SIM]
02. Select our eSIM
03. Tap [Preferred network type]
04. Select 3G temporarily
Please contact us via [email protected] for further assistance.
What should I do, when I see the “Activating” status while installing an eSIM before arriving at the destination?
If your eSIM shows an “Activating” status before you arrive at your destination, it will automatically set up once you reach your destination.
To ensure you can use your data successfully upon arrival, please follow these steps and avoid removing the plan, as it cannot be reissued or reinstalled after deletion:
A. Enable “Data Roaming” for the eSIM
B. Reset the Network Connection & Restart Your Device
01. Turn on Airplane mode for 15 seconds, then turn it off to reset the network connection.
02. Restart your device.
Please note that the eSIM plan’s validity might begin as soon as you scan and install the QR code, depending on your plan, despite this issue.
For further assistance, contact us at [email protected].
Error : Unable to Activate eSIM. You can try again, or contact your carrier for assistance.
If you see the message “Unable to Activate eSIM. You can try again, or contact your carrier for assistance.,” it typically means that the connection to download the eSIM plan was disrupted.
To resolve this issue, ensure your device has a stable and unrestricted internet connection when attempting to download the eSIM profile from the LPA server. Try adding the eSIM plan manually while connected to a reliable internet network.
While the most recommended installation method is scanning the QR code, if you encounter issues with scanning, you can enter the details manually.
Apple
01. Go to [Settings] > [Cellular/Mobile Service] > [Add eSIM]
02. Tap [Use QR code]
03. Click [Enter Details Manually]
04. Enter the ‘SM-DP+ Address’ and ‘Activation Code’ provided in the email.
(Please make sure you don’t paste with https:// or http://)
05. Your eSIM plan will be activated automatically once the details are set
Samsung
01. Go to [Settings] > [SIM Card Manager] > [Add eSIM]
02. Tap [Scan QR code] > [Enter activation code]
03. Enter the ‘Activation Code’ provided in the email.
(Please make sure you don’t paste with https:// or http://)
04. Click “Add”
05. Your device will automatically start the activation process. Follow the on-screen instructions to complete the installation
01. Go to [Settings] > [Network & Internet] > [SIMs]
02. Select [+Add SIM] > [Download a new eSIM]
03. Tap [Need help?] > [Enter it manually]
04. Enter the ‘Activation Code’ provided in the email.
(Please make sure you don’t paste with https:// or http://)
05. Your eSIM plan will be activated automatically once the details are set
Please let us know via [email protected] if you need further assistance.
Error : eSIM Cannot Be Added. This code is no longer valid. Contact your network provider for more information.
If you encounter the message “eSIM Cannot Be Added. This code is no longer valid. Contact your network provider for more information.”, it indicates that the eSIM plan you are trying to add has either been previously activated or that there was an issue scanning the QR code due to a poor connection.
To resolve this issue, please check the following:
01. Ensure that the eSIM is not already added to your device.
02. Verify that you have a stable network or WiFi connection.
03. Check if your device has reached the maximum number of eSIM profiles it can support.
For the best results, we recommend scanning the QR code. If scanning issues persist, you may manually enter the eSIM details.
Apple
01. Go to [Settings] > [Cellular/Mobile Service] > [Add eSIM]
02. Tap [Use QR code]
03. Click [Enter Details Manually]
04. Enter the ‘SM-DP+ Address’ and ‘Activation Code’ provided in the email.
(Please make sure you don’t paste with https:// or http://)
05. Your eSIM plan will be activated automatically once the details are set
Samsung
01. Go to [Settings] > [SIM Card Manager] > [Add eSIM]
02. Tap [Scan QR code] > [Enter activation code]
03. Enter the ‘Activation Code’ provided in the email.
(Please make sure you don’t paste with https:// or http://)
04. Click “Add”
05. Your device will automatically start the activation process. Follow the on-screen instructions to complete the installation
01. Go to [Settings] > [Network & Internet] > [SIMs]
02. Select [+Add SIM] > [Download a new eSIM]
03. Tap [Need help?] > [Enter it manually]
04. Enter the ‘Activation Code’ provided in the email.
(Please make sure you don’t paste with https:// or http://)
05. Your eSIM plan will be activated automatically once the details are set
Please let us know via [email protected] if you need further assistance.
Error : eSIM Not Supported. This eSIM is not compatible with this iPhone. Contact your carrier for more information.
If you see the message “eSIM Not Supported. This eSIM is not compatible with this iPhone. Contact your carrier for more information.”, it usually indicates that your phone might be carrier-locked.
To resolve this, contact the carrier that supplied your phone and request an unlock.
For instructions on checking if your device is unlocked, please follow these steps:
Apple
01. Go to [Settings] > [General] > [About] and scroll down
02. If you see “Carrier Lock – No SIM restrictions” and “eSIM – IMEI (number will appear),” your phone is compatible with eSIM
03. If you can’t find these, your phone doesn’t support eSIM
Samsung
01. Go to [Settings] > [Connections] > [Mobile networks]
02. Choose [Select roaming network/Network operators]
03. Toggle off ‘Select automatically’◦ If multiple networks appear, the phone is likely unlocked.◦ If only one network appears, or if the Search Networks option is unavailable, the phone is most likely locked to the carrier.
01. Go to [Settings] > [Network & Internet] > [SIMs]
02. Select your current SIM
03. Toggle off [Automatically select network]◦ If multiple networks appear, the phone is likely unlocked.◦ If only one network appears, or if the Search Networks option is unavailable, the phone is most likely locked to the carrier.
Please let us know via [email protected] if you need further assistance.
Error : The eSIM card cannot be activated right now please try again later.
If you see the message “The eSIM card cannot be activated right now please try again later.”, it indicates that the QR code was partially scanned due to poor connection. So try adding the eSIM plan manually while connected to a good network connection.
The most recommended installation method is scanning the QR code. However, if you experience issues scanning the QR code, you may enter details manually.
Apple
01. Go to [Settings] > [Cellular/Mobile Service] > [Add eSIM]
02. Tap [Use QR code]
03. Click [Enter Details Manually]
04. Enter the ‘SM-DP+ Address’ and ‘Activation Code’ provided in the email.
(Please make sure you don’t paste with https:// or http://)
05. Your eSIM plan will be activated automatically once the details are set
Samsung
01. Go to [Settings] > [SIM Card Manager] > [Add eSIM]
02. Tap [Scan QR code] > [Enter activation code]
03. Enter the ‘Activation Code’ provided in the email.
(Please make sure you don’t paste with https:// or http://)
04. Click “Add”
05. Your device will automatically start the activation process. Follow the on-screen instructions to complete the installation
01. Go to [Settings] > [Network & Internet] > [SIMs]
02. Select [+Add SIM] > [Download a new eSIM]
03. Tap [Need help?] > [Enter it manually]
04. Enter the ‘Activation Code’ provided in the email.
(Please make sure you don’t paste with https:// or http://)
05. Your eSIM plan will be activated automatically once the details are set
Please let us know via [email protected] if you need further assistance.
Error : Invalid Activation Code. The activation code you are attempting to use is not valid. Contact your network provider for more information.
If you see the message “Invalid Activation Code. The activation code you are attempting to use is not valid. Contact your network provider for more information,” it indicates that the QR code is not valid. Please contact us via [email protected] if you need further assistance.
Can’t find what you’re looking for?
To ask ESIMJAPAN.com Support, contact ESIMJAPAN.com Team anytime

