Tired of switching between multiple physical SIMs or paying for expensive roaming charges? The good news is that you don’t have to worry anymore, as eSIM technology on your iPhone makes connectivity simple. All you have to do is just scan your QR code, and you’re ready to go. eSIMs are the best partners for travelers who need instant connectivity abroad or for anyone managing personal and business numbers in the same device.
Key Considerations for Successful eSIM Setup
| Feature | Details |
|---|---|
| Device Compatibility | iPhone XR, XS, XS Max, and later Regional compatibility matters – iPhones from China, Hong Kong, and Macau may not support eSIM |
| Stable Internet Connection | A stable internet connection is required during the entire activation process |
| Activation Methods | QR code scan or manual installation |
| Unlocked Device | Device must be carrier-unlocked to activate eSIMs from different providers |
| eSIM Storage Limit | Up to 20 eSIMs stored, 2 active simultaneously |
Before You Start
1. Check Device Compatibility
Your iPhone must have an IMEI (International Mobile Equipment Identity) to support eSIM technology. Check your device’s IMEI by dialing *#06# or going to Settings > General > About.
Review the compatibility list below to confirm your iPhone model supports eSIM:
| iPhone Model | eSIM Support | Notes |
|---|---|---|
| iPhone 16/15/14/13/12/11 series | Yes | Full eSIM functionality with dual SIM support |
| iPhone SE2 (2020) SE3 (2022) | Yes | Supports one physical SIM + one eSIM |
| iPhone XR/XS/XS Max | Yes | First models with eSIM support |
| iPhone X | No | Released before eSIM technology |
| iPhone SE | No | Original model lacks eSIM hardware |
| iPhone 6/7/8 series | No | Physical SIM only |
| iPad Pro (2018) or newer | Yes | Cellular models only, Wi-Fi models don’t support eSIM |
Check the full list of devices supporting eSIM (Apple iPhone, Samsung Galaxy, Google Pixel, Xiaomi, Motorola, OnePlus)
2. Device and Setup Requirements
Before installation, ensure you have:
- Compatible manufacturing region — iPhones manufactured in China, Hong Kong, or Macau do not support eSIM
- Carrier-unlocked iPhone — locked devices may restrict eSIM activation from other providers
- Stable internet connection — Wi-Fi or cellular data for profile download
- Latest iOS version — updates often include eSIM compatibility improvements
- eSIM activation details — SM-DP+ Address and activation code from your provider
How to Install eSIM
With compatibility and all requirements met, you’re ready to install your eSIM. There are two main ways to do this: the easiest and most common method is to scan a QR code to automatically download your eSIM profile. Alternatively, you can install the eSIM by manually entering the required information. Let’s walk through each method step-by-step.
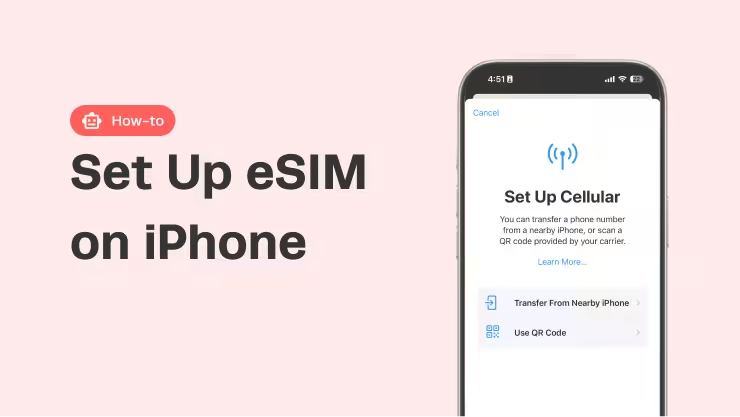
1. QR Code Installation Method (Most Common)
- Open [Settings] → Tap [Cellular] or [Mobile Service]
- Select [Add eSIM] → Choose [Use QR Code]
- Position the camera to scan the QR code provided by your eSIM provider
- Tap “Continue” when the “Cellular Plan Detected” notification appears
- Complete setup by following the on-screen prompts
2. Manual Installation Method
When QR codes aren’t available or scanning fails:
- Navigate to [Settings] → [Cellular] → [Add eSIM]
- Select [Enter Details Manually] at the bottom of the screen
- Input the following information:
- SM-DP+ Address: Server address from your provider
- Activation Code: Unique identifier for your plan
- Tap “Next” and follow activation prompts
Cautions
While eSIM installation is often instant, it can sometimes take a few minutes to complete, depending on your network and carrier. Please don’t interrupt the process if it’s not immediate.
Troubleshooting Common Issues
1. Installation Failures
If you’ve followed the installation steps and are still having trouble, checking the following can help resolve the issue:
- Verify Wi-Fi connection — installation requires a stable internet connection
- Check eSIM compatibility — confirm if your iPhone supports eSIM functionality
- Check existing eSIM profiles — verify that the eSIM isn’t already installed in Settings > Cellular
- SM-DP+ Address errors — verify all characters and spacing are correct, and ensure no “https://” or “http://” prefix is included
- Contact the provider for a fresh QR code — codes sometimes expire after 24-48 hours
2. No Internet Problem
You’ve successfully installed your eSIM, but still have no internet connection? That can be frustrating. Here are some solutions to help you get online:
Quick fixes to try first:
- Enable data roaming — most eSIM providers require this setting for internet access
- Set eSIM as primary data line — ensure the correct eSIM is selected in [Settings] > [Cellular]
- Restart iPhone — power off, wait 30 seconds, then power on
- Toggle Airplane Mode — turn on for 10 seconds, then off
- Update iOS — check [Settings] > [General] > [Software Update]
Advanced solutions:
- Reset network selection: [Settings] → [Cellular] → [eSIM Plan] → turn off “Automatic” network search
- Toggle eSIM line: Turn off “Turn On This Line” for 10 seconds, then re-enable
Master iPhone eSIM Setup for Seamless Connectivity
You may get multiple carrier options and quick digital access by setting up an eSIM on your iPhone. Due to their many activation methods and compatibility for up to 20 eSIM profiles, iPhones make dual-number usage and foreign travel easy and practical.
ESIMJAPAN.com makes your travel connectivity convenient with plans starting at $4.99, offering unlimited data plans for Japan and calls to global coverage across 149 countries. Enjoy full coverage on your next trip to Japan by following all the guides mentioned above, and have a pleasant trip in Japan.


Leave a Reply